Best Practices for Travel Expense Reports
Travel expense reports are critical for managing costs, ensuring compliance, and speeding up reimbursements. Whether you're an employee submitting expenses or a business tracking travel budgets, clear and accurate reports are essential. Here's what you need to know:
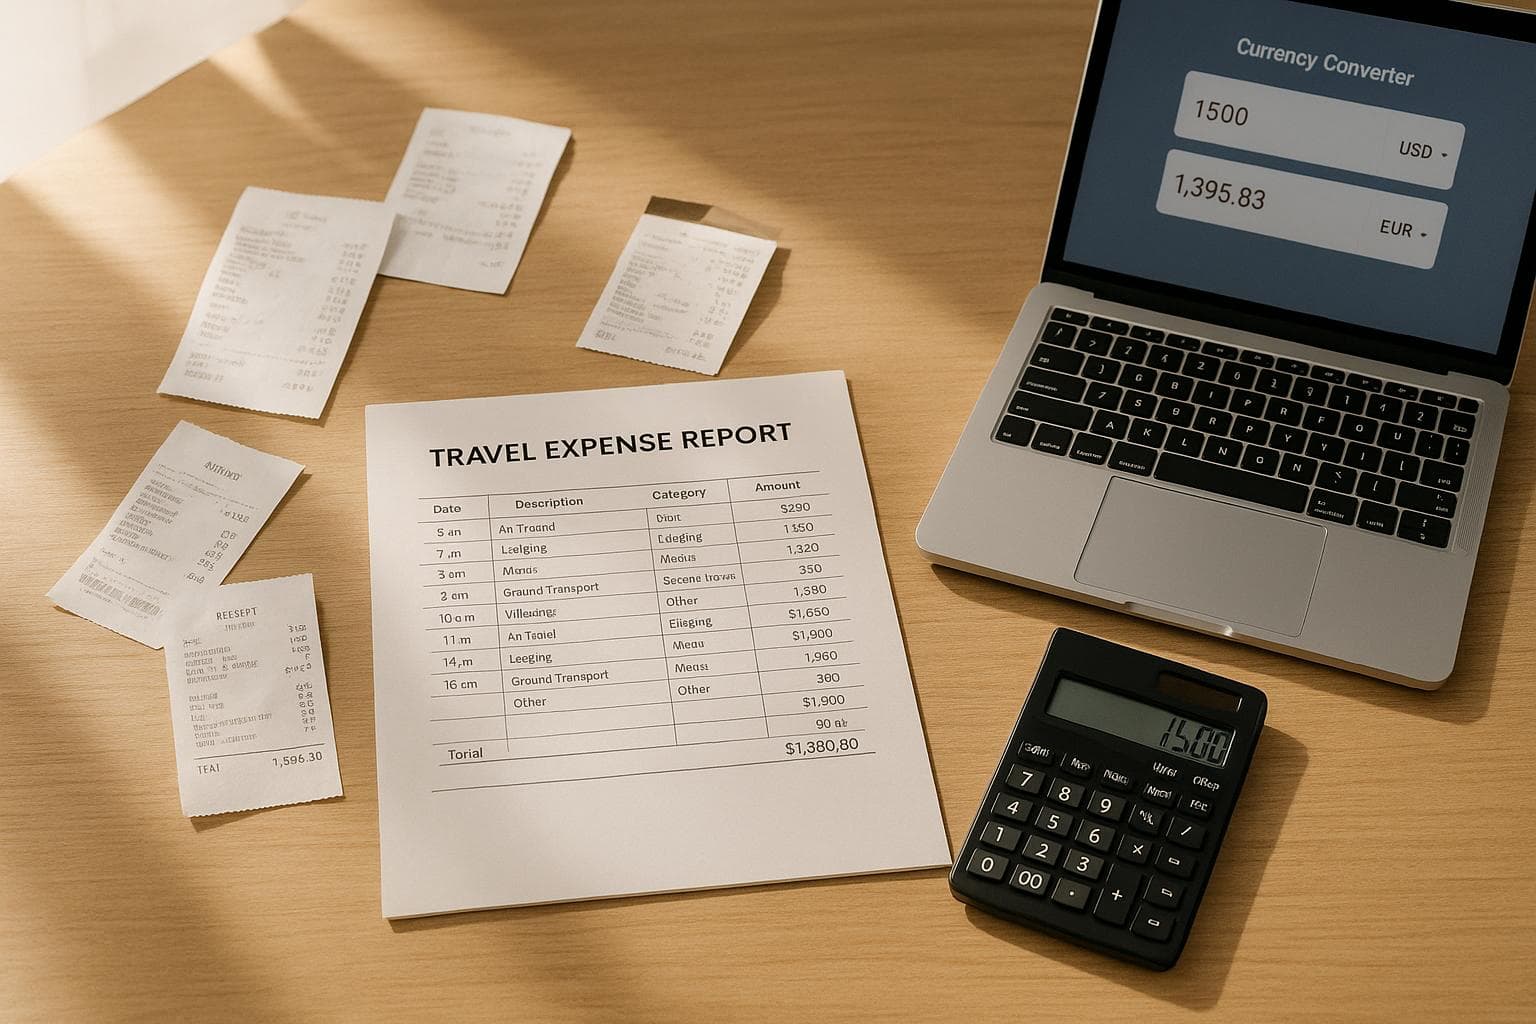
- Include Key Details: Employee info, trip specifics, itemized expenses, and receipts are mandatory.
- Organize Expenses: Use categories like transportation, lodging, meals, and incidentals.
- Track in Real-Time: Record expenses daily and save receipts digitally to avoid errors.
- Avoid Common Mistakes: Misclassified expenses, missing receipts, and vague descriptions delay approvals.
- Use Tools: Platforms like EasyTripExpenses simplify receipt management, categorization, and reporting.
Managing Business Travel Expenses Made Easy
What to Include in Every Travel Expense Report
Make sure your travel expense report includes all the necessary details to get approval and meet IRS requirements. This helps avoid delays and ensures compliance.
Required Information and Fields
Start with your basic details: your full name, department, job title, and employee ID. Then, document the trip specifics, including the destination (city and country), travel dates (start and end times), and a clear explanation of the business purpose.
The heart of your report is the itemized expense section. For each expense, include the date, vendor, description, amount, and category (e.g., airfare, lodging, meals, transportation). If your trip involved international travel, make sure to note any VAT amounts.
Attach all necessary receipts. For expenses over $75, receipts are mandatory. When it comes to lodging, include the original itemized statement that shows the hotel name, address, dates of stay, and daily room charges - credit card slips alone won’t suffice. For airfare, ensure the receipt includes your name, itinerary, and proof of payment.
| Field Category | What to Include | Why It Matters |
|---|---|---|
| Employee Details | Full name, department, job title, employee ID | Identifies who incurred the expenses |
| Trip Information | Travel dates, destination, business purpose | Establishes the legitimacy of business travel |
| Itemized Expenses | Date, vendor, amount, expense category, description | Provides a detailed breakdown of spending |
| Documentation | Receipts, invoices, statements | Verifies expenses and satisfies IRS requirements |
| Approval Section | Traveler signature, manager signature, settlement date | Confirms review and authorization |
Wrap up your report with a financial summary. This should show the total expenses, how much the company owes you, and any amount you might owe the company.
Once you've included all the required details, focus on making the report easy to read and review.
How to Format Reports for Easy Reading
Clear formatting is just as important as complete documentation. A well-organized report speeds up the review process.
Use a standardized template to keep things consistent, minimize errors, and make approvals quicker. Group expenses under clear headings and provide concise yet specific descriptions for each line item. For example, instead of writing "dinner", specify "client dinner with ABC Corp representatives."
Always format currency consistently as $1,234.56. For foreign expenses, include the original amount, its USD equivalent, and the exchange rate - for instance, "€850.00 (exchange rate 1.08 = $918.00)."
Avoid using special characters like |, ;, or " to prevent upload errors. Add a notes section to explain any unusual expenses, such as why a meal exceeded the company’s per diem.
Lastly, save digital copies of all receipts in a secure folder during your trip. This makes attaching them to your report quick and hassle-free.
Common Expense Categories for Business Travel
Knowing the typical expense categories for business travel helps you structure your report properly and ensures you don’t miss or misclassify any costs. Keeping things well-organized and documented is key to maintaining accuracy and compliance.
Main Categories and Examples
Transportation includes all expenses related to getting to and from your destination. This could mean airfare, train tickets, bus fares, car rentals, rideshare services like Uber or Lyft, taxis, airport shuttles, and even personal vehicle use. For personal cars, you can deduct expenses based on actual costs or the IRS standard mileage rate. Don’t forget to account for extras like baggage fees, tolls, and parking charges.
Lodging covers accommodation costs during your trip. While this typically involves hotels or motels, it can also include short-term rentals if needed. As noted by IRS Tax Tip 2023-15, “Travel expenses must be ordinary and necessary. They can't be lavish, extravagant or for personal purposes”. Make sure your lodging choices are reasonable and align with your company’s travel policy.
Meals refer to food and beverages consumed during your trip. Many businesses use per diem rates to streamline meal reimbursement. For instance, if your daily meal allowance is $75, only expenses within that limit qualify for full reimbursement. This system ensures fairness while offering flexibility within a set budget.
Incidentals and miscellaneous costs include other small, business-related expenses that don’t fall into the main categories. Examples are tips for service staff, laundry or dry cleaning during extended trips, business center fees, Wi-Fi charges, and conference registration fees. Keeping a consistent record of these expenses is important.
Once your expenses are sorted into the right categories, the next step is ensuring you have the correct documentation to back them up.
What Documentation You Need
Accurate categorization is only useful if supported by proper documentation. The IRS has clear rules on what you need to keep. Lodging expenses always require receipts, no matter the amount. Whether your hotel bill is $50 or $500, you must have an itemized receipt showing the hotel’s name, address, dates of stay, and daily charges. For other business expenses over $75, you’ll need itemized receipts as well. Credit card statements or bank records can supplement receipts but aren’t enough on their own. These documents must verify the amount, date, location, business purpose, and anyone involved.
For all expenses, you’ll need to document five essential details: the amount spent, the date, the location, the business purpose, and, for entertainment or gifts, the business relationship of the people involved. If you’re claiming mileage for a personal vehicle, keep a mileage log that includes dates, destinations, business purposes, and miles driven. This log will serve as your main proof for mileage deductions.
How to Create Accurate Expense Reports: Step-by-Step
Step-by-Step Guide to Creating Accurate Travel Expense Reports
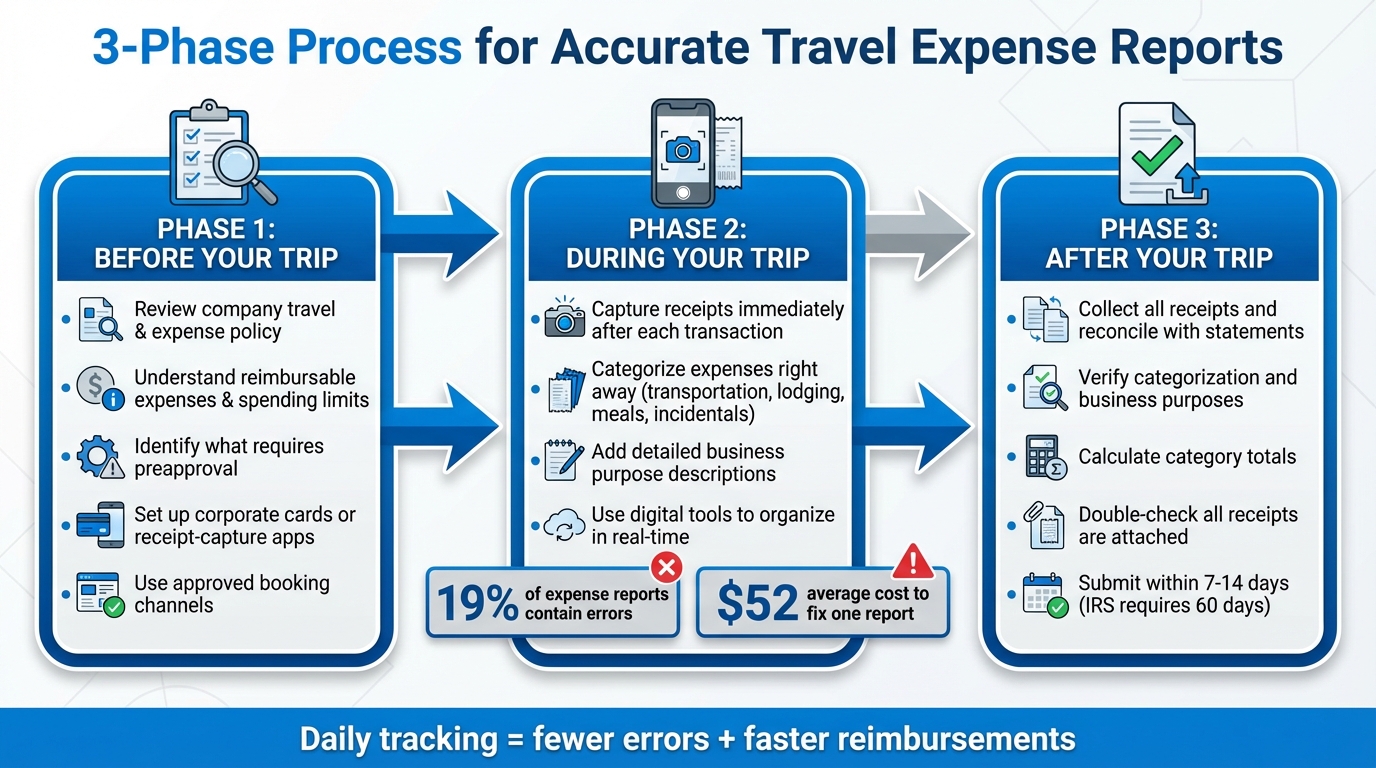
Creating a precise travel expense report is not something to put off until after your trip. The process unfolds in three stages - before your trip, during your travels, and after you return. Each phase plays a crucial role in avoiding mistakes that can delay reimbursements.
Before Your Trip
Start by reviewing your company's travel and expense policy. Understand which expenses are eligible for reimbursement, what requires preapproval, and any spending limits. For instance, expenses like first-class airfare or luxury hotels might need prior authorization.
"Clear expectations upfront make reporting much easier. Make sure employees understand your travel and expense policy, including what's reimbursable, what requires preapproval, and any spending limits. Equip them with the right tools, such as corporate cards or receipt-capture apps, so they can track expenses from the start." – Feli Oliveros, Contributor, Ramp
If your company provides tools like corporate or virtual cards, or apps for capturing receipts, ensure these are set up before you leave. Additionally, use any approved booking channels for flights or hotels to centralize spending data and streamline reconciliation later on.
Once you’ve prepared thoroughly, focus on tracking expenses in real time while traveling.
Tracking Expenses While Traveling
Make it a habit to capture receipts immediately after every transaction, either by photographing them or using a scanner app. This practice reduces the risk of losing receipts or forgetting charges. Considering that 19% of expense reports contain errors and companies can spend up to 18 minutes and $52 to fix a single report, staying on top of your expenses as they happen is critical.
As you record each expense, categorize it right away into groups such as transportation, lodging, meals, or incidentals. This immediate organization not only simplifies your final report but also supports accurate project costing and ensures compliance with tax requirements.
When your trip concludes, it’s time to consolidate everything and finalize your report.
After Your Trip: Organizing and Submitting
Once back, collect all your receipts and reconcile them with your credit card statements or bank records. Review each expense to confirm it’s properly categorized and includes a clear business purpose. Most companies require expense reports to be submitted within 7–14 days of returning, though some extend this to 45 days. Keep in mind, the IRS requires expenses to be fully accounted for within 60 days of payment or incurrence.
Next, calculate category totals, double-check that all necessary receipts are attached, and ensure amounts match your records. Submit your report through your company’s designated system, including all supporting documents. Following these steps will help you avoid errors and ensure you’re reimbursed promptly.
sbb-itb-386cb5b
Best Practices for Accurate and Compliant Reports
Accuracy and compliance require consistent effort throughout your trip. By sticking to some straightforward habits, you can ensure your expense reports are both accurate and compliant.
Record Expenses Daily
Don’t put it off - log your expenses as they happen. Snap a photo of each receipt and categorize it right away. For example, instead of writing just "dinner", specify "client meeting with ABC Corp to discuss Q1 contract renewal." A receipt documented on the same day is far easier to justify than one you try to recall weeks later.
Daily tracking lays the groundwork for error-free reporting and keeps everything fresh in your mind.
Converting Foreign Currency to US Dollars
When traveling abroad, pay close attention to currency conversion. Always record expenses in the original currency and then convert them to U.S. dollars using the exchange rate from the transaction date. The IRS requires all amounts on U.S. tax returns to be reported in U.S. dollars and mandates using the exchange rate in effect when the transaction occurred.
Many expense management tools can automatically handle this conversion, reducing the chance of mistakes. If you’re not using such software, include verifiable conversion records - like bank transaction screenshots - with your report. This ensures your documentation meets IRS requirements and avoids potential audit issues.
How to Avoid Common Errors
To build on accurate recording and proper currency conversion, steer clear of these common mistakes: vague labels, duplicate entries, and missing receipts. Reconcile your records with credit card statements before submitting your report to catch any discrepancies.
Always include a detailed business purpose for each expense. For instance, instead of "dinner", specify "dinner meeting with vendor to discuss project integration." Keep both digital and physical copies of receipts, organized by date and category. If a receipt is damaged or illegible, make a note of the vendor’s name, the amount, the date, and the business purpose, and attach supporting documents like confirmation emails or bank records.
Using EasyTripExpenses to Simplify Your Reports
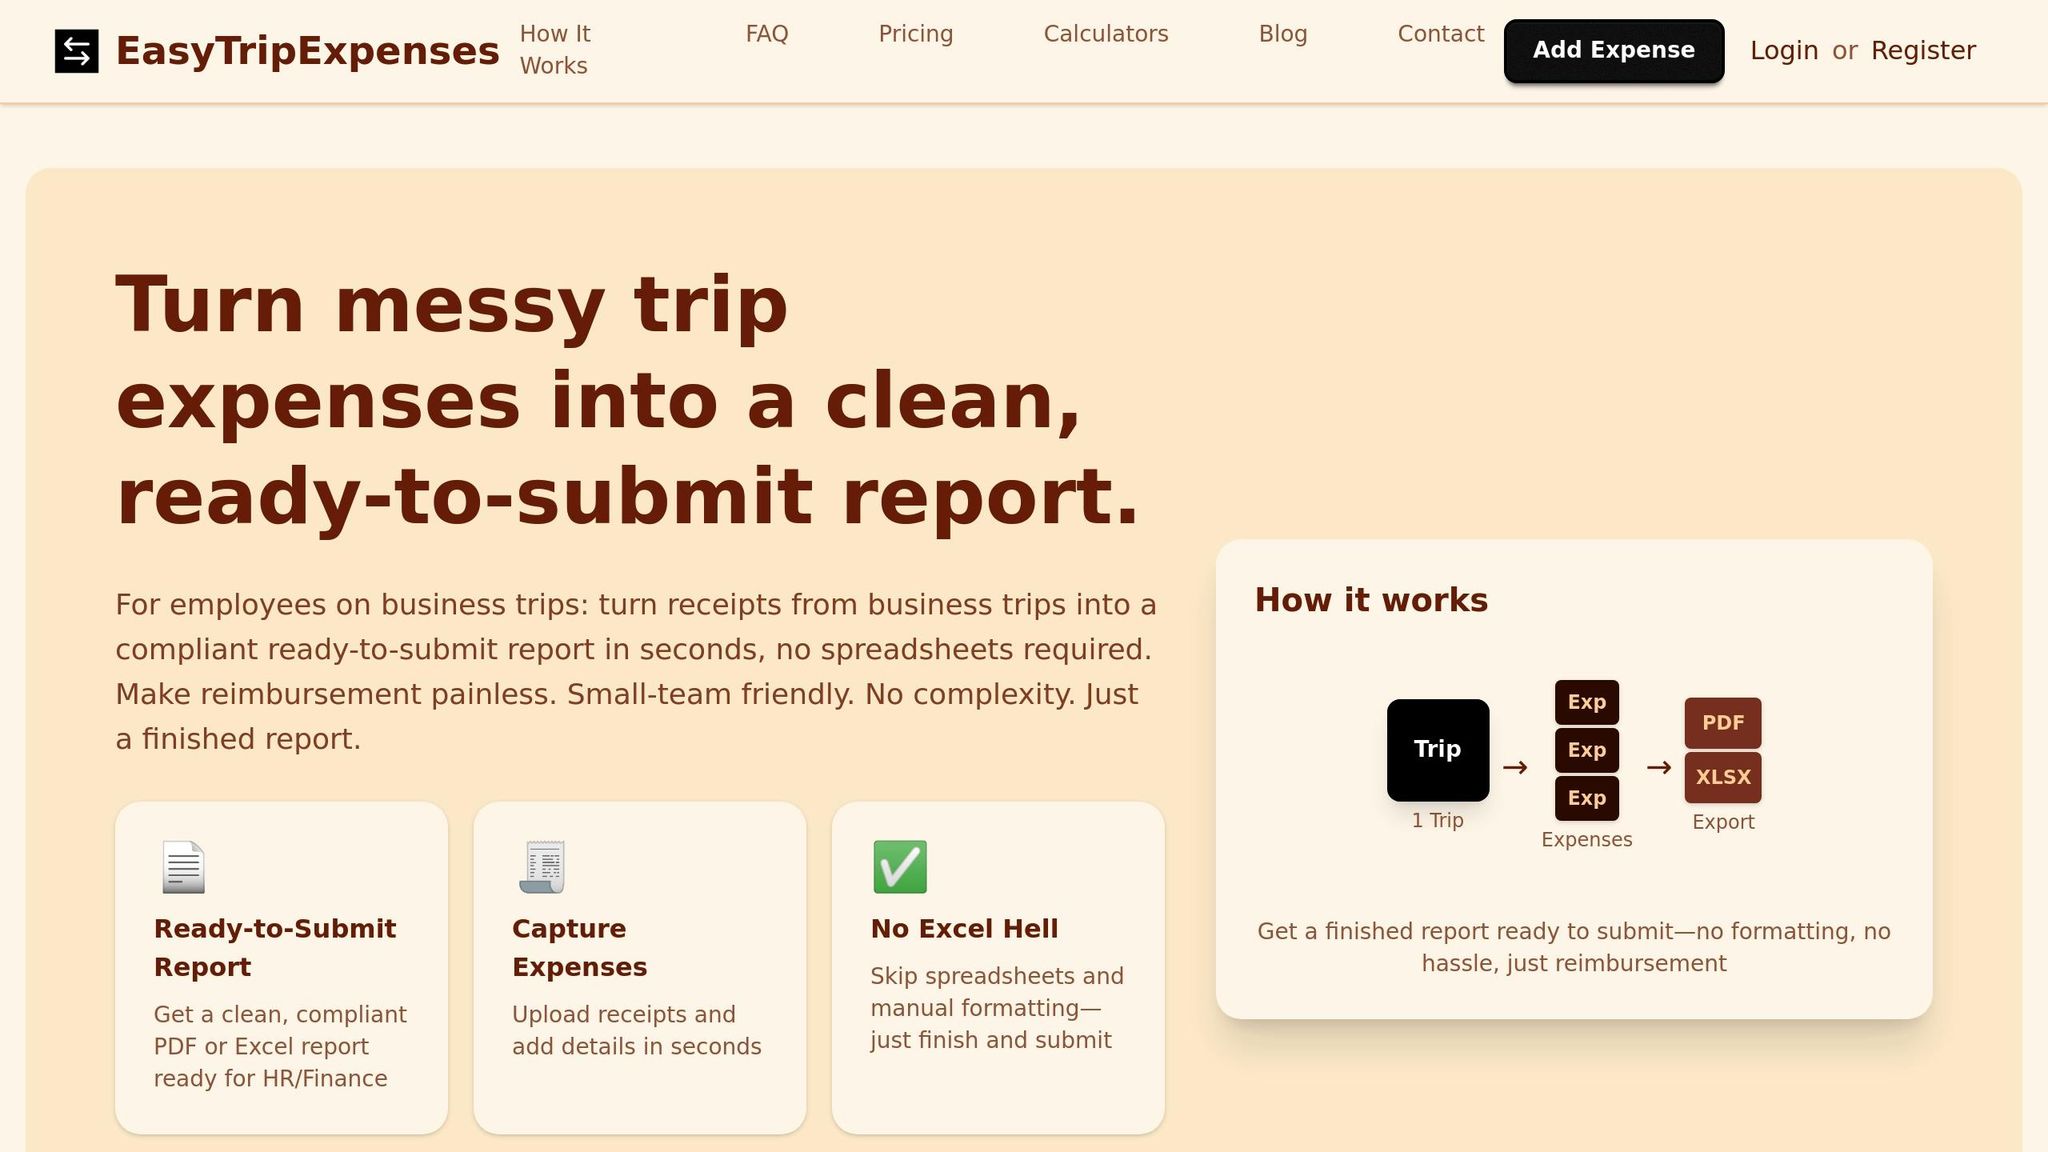
Once you've nailed down the basics of expense tracking, the next step is finding a tool that makes reporting a breeze. That’s where EasyTripExpenses comes in. This platform takes the chaos out of managing receipts and turns them into polished, ready-to-submit reports - no tech expertise needed.
Features and How It Works
EasyTripExpenses is designed to handle the tedious parts of expense management. You can upload receipts as images or PDFs, categorize expenses in seconds, and even add short notes for context. When you're ready, generate professional reports in either PDF or Excel format.
The tool also offers automatic currency conversion and a secure, easily accessible trip history, so you can skip the hassle of manual recordkeeping. Plus, since it’s web-based, you can access it from any device - no extra software downloads required.
Pricing Plans Overview
EasyTripExpenses keeps things simple with three pricing options tailored for small teams and startups:
- Starter Plan: Free forever. Includes up to 5 uploads per trip, manual expense entry, currency conversion, and one year of trip history. Perfect for occasional users.
- Pro Monthly Plan: $9 per month. Expands to 20 uploads per trip and extends trip history to three years. Ideal for regular travelers.
- Pro Yearly Plan: $60 per year (just $5 per month). Offers up to 50 uploads per trip, five years of trip history, and saves you 45% compared to monthly billing. A great choice for frequent travelers.
All paid plans include the option to request new features, and an OCR tool for auto-filling expenses from uploaded files is on the way. Whether you choose free or paid, every plan supports PDF and Excel reporting with no hidden fees or per-user charges.
Mistakes to Avoid in Travel Expense Reports
Even the most careful travelers can make mistakes when it comes to expense reporting. In fact, 20% of expense reports contain errors, and correcting just one mistake can cost around $50 in processing fees. These errors not only slow down reimbursements but also create extra work for finance teams and can trigger concerns during audits. By understanding common missteps, you can streamline the process and submit accurate reports from the start. Below are some frequent mistakes to watch out for.
Missing or Unreadable Receipts
Lost or illegible receipts are among the most frequent issues in expense reporting. When receipts are damaged or missing, it becomes harder to verify expenses, leading to delays in reimbursements and complications during audits. The stakes are higher than just inconvenience - businesses lose an estimated 5% of their annual revenue to fraud. According to the Association of Certified Fraud Examiners, expense reimbursement fraud accounted for 13% of cases in a 2024 study, with a median loss of $50,000 per year - a significant jump from $40,000 in 2022.
To avoid this, make it a habit to digitize your receipts. Scanning or photographing them ensures you have a backup and keeps them accessible for future reference. Some companies have adopted instant receipt capture through SMS, cutting receipt collection time by 48%.
Incorrect Expense Categories
Another common pitfall is misclassifying expenses. For example, labeling a client dinner as office supplies or categorizing ground transportation as airfare can distort financial data and complicate reporting. Proper categorization is crucial for tax compliance and for companies to accurately track spending, allocate budgets, and enforce travel policies. Errors here can delay reimbursements and even attract scrutiny during audits.
Before submitting your report, carefully review each expense to ensure it's in the right category. If you're unsure, reach out to your finance team for guidance.
Unapproved or Unjustified Expenses
Submitting expenses without clear justification or proper approval can also cause problems. Finance teams need to understand the business purpose behind each expense - like a last-minute dinner or an upgrade to business class - to process it correctly. Without adequate context, expenses that fall outside company policies are more likely to be rejected.
This is especially true for costs that exceed typical limits or don’t fit within standard categories. For instance, if you had to book a more expensive hotel because the company-preferred option wasn’t available, make sure to explain the situation in your report. Addressing these details upfront will help improve the accuracy and approval rate of your expense reports.
Conclusion
Keeping travel expense reports accurate is key to maintaining financial oversight, ensuring compliance, and fostering trust between employees and finance teams. Submitting reports with detailed documentation, accurate categorization, and clear business reasons helps your organization monitor spending, stick to budgets, and meet IRS accountable plan requirements.
To stay on top of things, digitize your receipts as soon as possible, categorize expenses correctly, and aim to submit your report within 7–14 days. This approach minimizes delays and reduces the chance of errors.
Automation makes this process even easier. Instead of juggling spreadsheets and stacks of receipts, tools like EasyTripExpenses take care of the hard work. From organizing receipts and handling currency conversions to producing polished reports in PDF or Excel format, these tools simplify everything. Plus, with secure data storage and no need for complex IT setups, you can focus on your job instead of tedious admin tasks.
Using automation doesn’t just speed up the process - it also promotes smarter expense management practices.
Whether you’re an employee aiming for quicker reimbursements or a finance manager looking for better insight into travel costs, adopting these best practices will save time, cut down on mistakes, and make expense reporting a smoother experience for everyone. Tools like EasyTripExpenses transform what used to be a hassle into a seamless and reliable process.
FAQs
What should I do if I lose a receipt for an expense over $75?
If you've misplaced a receipt for an expense over $75, your first step should be to reach out to the merchant and request a duplicate. If you paid using a credit or debit card, most businesses can easily provide a copy.
In cases where obtaining a duplicate isn't possible, you can create a Statement in Lieu of Receipt. This document should outline key details such as the date of the transaction, the amount spent, the merchant's name, and a brief explanation of the expense. It acts as an official record to support reimbursement claims and helps maintain compliance with reporting rules.
What steps should I take to ensure my travel expenses meet IRS guidelines?
To stay in line with IRS guidelines for travel expenses, it's crucial to keep detailed records. This includes saving receipts, proof of payment, travel dates, and a clear explanation of the business purpose for each expense. Aim to submit all records within 30–60 days after your trip to meet accepted timelines.
Using an accountable plan is also key. This involves separating personal or excessive costs from business-related ones and ensuring all expenses are tied directly to your business activities. Staying organized and maintaining accurate records can help you sidestep problems during audits or reimbursement reviews.
What are the advantages of using EasyTripExpenses to manage travel expenses?
Managing travel expenses becomes a breeze with EasyTripExpenses, thanks to its ability to automate essential tasks like uploading receipts, categorizing expenses, and generating detailed reports. This not only cuts down on time spent but also minimizes errors, ensuring your expense reports are accurate and polished.
The platform offers additional features such as secure data storage, built-in currency conversion, and flexible options for creating reports in PDF or Excel formats. These tools make it especially useful for small teams and businesses. By simplifying the entire process, EasyTripExpenses keeps you organized and ensures compliance with company policies.