
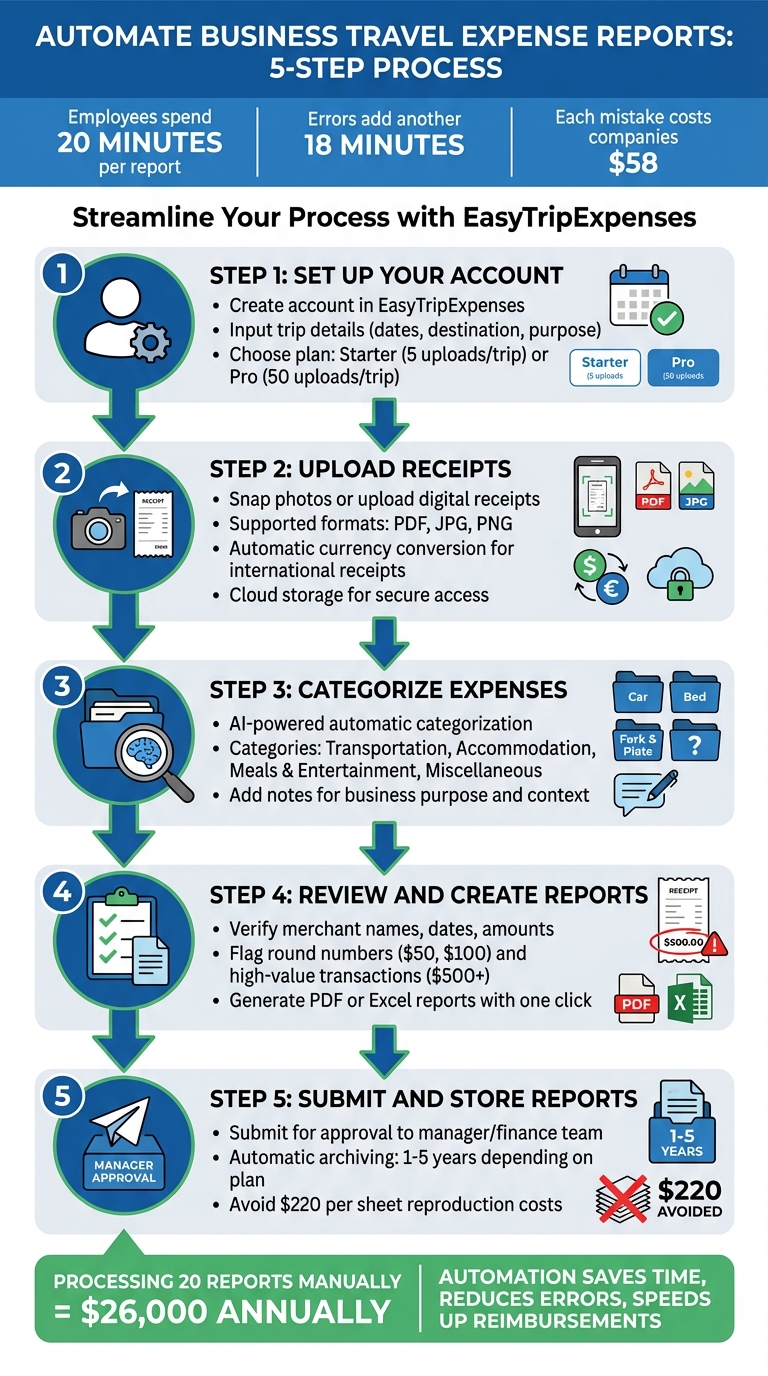
5 Steps to Automate Business Travel Expense Reports
Managing travel expenses manually is time-consuming, error-prone, and frustrating. On average, employees spend 20 minutes per report, with errors adding another 18 minutes and costing companies $58 per mistake. Automation can save time, reduce errors, and simplify the process. Here's how you can automate your business travel expense reporting in five simple steps:
- Set Up Your Account: Use tools like EasyTripExpenses to create an account and input trip details like dates and purpose.
- Upload Receipts: Snap photos or upload digital copies of receipts directly from your phone or computer.
- Categorize Expenses: Automatically sort expenses into categories like transportation, meals, and accommodation using AI-powered tools.
- Review and Create Reports: Double-check entries for accuracy and generate polished PDF or Excel reports with one click.
- Submit and Store Reports: Submit your report for approval and securely archive it for future reference.
These steps streamline expense reporting, eliminate manual errors, and speed up reimbursements. Tools like EasyTripExpenses offer features like automatic currency conversion, receipt storage, and detailed reporting to make the process effortless. Say goodbye to messy receipts and focus on work that matters.
5 Steps to Automate Business Travel Expense Reports
Step 1: Set Up Your Account and First Trip
Sign Up for EasyTripExpenses
To get started, head to EasyTripExpenses and click on "Sign Up" or "Create a new account." Choose between the Starter plan (free, with up to 5 uploads per trip) or the Pro plan (offering up to 50 uploads and a 5-year trip history), depending on how often you travel. Once you’re signed up, you’ll be ready to set up your first trip.
Enter Your Trip Information
After signing up, click the green "Create" button, then select "Create report" to begin setting up your trip. Fill in the key details: your destination, travel dates (MM/DD/YYYY), and the purpose of your trip - examples might include "Client meeting in Boston" or "Sales conference in Dallas." These details are essential for staying compliant with audits and tax requirements.
"Accurately recording when and where expenses were incurred is crucial for verification and compliance." – Expensify
Step 2: Upload Your Receipts
How to Upload Receipts
You can upload receipts using the web dashboard or your mobile device. EasyTripExpenses supports PDF, JPG, and PNG files, giving you plenty of options to record your expenses. Whether you snap a photo, upload an image, or drag and drop files, the process is straightforward.
For the best results, place your receipts on a flat surface with good lighting and a contrasting background. This ensures details like the merchant name, date, and total amount are easy to read. If you’re dealing with a long receipt, take multiple photos - the system will automatically combine them into a single record. Once uploaded, all receipts are securely stored in the cloud, so you can skip the hassle of physical storage and avoid the risk of losing them.
Automatic Currency Conversion
Handling international receipts? EasyTripExpenses has you covered with automatic currency conversion. It uses the transaction date on the receipt to apply the correct historical exchange rate, converting amounts like EUR or GBP into USD. If the system misinterprets a currency symbol - say, confusing $ (USD) with S$ (SGD) - you can easily edit it manually. This ensures your expense totals are accurate and ready to be included in your report. Once the receipts are uploaded, you can move on to categorizing your expenses for a complete summary.
Step 3: Categorize Expenses and Add Notes
Categorize Your Expenses
Once you've uploaded your receipts, the next step is to turn those snapshots into meaningful financial data. EasyTripExpenses simplifies this process by using OCR and AI technology to automatically assign receipts to categories like Accommodation, Transportation, and Meals & Entertainment, based on the merchant and receipt details.
Some of the most common categories include:
- Transportation: Covers airfare, rental cars, fuel, parking, and rideshares.
- Accommodation: Includes hotel stays and related taxes.
- Meals & Entertainment: Think client dinners or business lunches.
- Miscellaneous: For items like internet fees, printing, or phone charges.
These standardized categories make reports consistent and easier for finance teams to review. If the system's automated categorization doesn’t align with your company’s needs - like tagging an expense to a specific project or client - you can quickly adjust it with a single click.
"Precise categorization improves visibility, helps surface cost-saving opportunities, and ensures clean, reliable financial data across the organization." - Paylocity
Why is this step so crucial? Travel is often one of a business's top three expenses, alongside salaries and software. Proper categorization allows finance teams to pinpoint overspending, track project profitability, and maintain tax compliance. For example, business travel expenses are only fully deductible if they’re accurately documented and categorized.
Once everything is categorized, you’re ready to add notes to give those expenses the context they need.
Add Notes to Expenses
While categories organize your expenses, notes provide the "why" behind each one. EasyTripExpenses lets you attach comments to every expense, ensuring approvers and auditors understand the business purpose. For instance, if you’re logging a team dinner, include details like attendee names and the topics discussed. For transportation, specify the destination and reason, such as: "Rental car for site visit to Dallas manufacturing facility."
"Each expense entry should include a clear, detailed description of the purchase or service, helping to justify the expense and maintain transparency in travel and expense reporting." - Expensify
Adding notes right after snapping a receipt photo saves you from scrambling to remember details later. Complete, detailed notes not only streamline the review process but also help avoid delays in reimbursement. Plus, clear documentation reduces the chances of your report being flagged, sparing everyone unnecessary back-and-forth.
With your expenses categorized and annotated, you’re ready to move on to reviewing your complete expense summary.
Step 4: Review and Create Reports
Check Your Expenses
Before you dive into creating a report, take a moment to carefully review every expense. Double-check that merchant names, dates, amounts, and tax details match the corresponding receipts. Pay extra attention to round numbers like $50.00 or $100.00, as these often hint at missing receipts or estimated values. High-value transactions, especially those over $500 or involving new vendors, should also get a closer look. Charges made on weekends or holidays are another red flag that might catch an auditor's attention.
"Ensure expense report accuracy by systematically verifying that all entries match receipt documentation exactly, amounts are calculated correctly, dates are accurate, categories align with organizational policies, and business purpose descriptions are clear and complete." - Artsyl Tech
If you spot an error, don't panic. Most platforms allow you to quickly edit the details or upload a replacement receipt image. For international expenses, the built-in currency conversion tool usually handles the math, converting amounts to U.S. dollars. That said, it's always a good idea to double-check the exchange rates and totals for accuracy.
"Discrepancies don't necessarily mean bad intent. They often stem from honest mistakes like forgotten personal charges on corporate cards, missing receipts, or confusion about approval requirements." - David White, Senior Content Marketing Manager at Relay
Once every detail is confirmed, you’re ready to generate your report.
Create PDF or Excel Reports
After verifying your expenses, generating the report is straightforward. With just one click, you can create a PDF for formal submissions or an Excel file for accounting imports.
The report will include essential details like the trip name, date range, and total amount in USD. Each expense line will list the transaction date, merchant, category, amount, and the business purpose you provided. Receipt images are automatically attached, so you meet documentation standards for audits. For meals and entertainment, make sure to include attendee names and a clear business purpose - this level of detail is often required under U.S. guidelines.
Expenses are grouped into standard categories such as Transportation, Accommodation, Meals & Entertainment, and Miscellaneous, aligning with common accounting structures. Subtotals for each category are calculated, and the report provides a final grand total that's been verified for accuracy. If international travel is involved, the report will show both the original currency and the converted U.S. dollar amount for added clarity.
Once the report is generated, you're ready to submit it for approval and save it for your records.
sbb-itb-386cb5b
Step 5: Submit and Store Reports
Submit Reports for Approval
Once your report includes at least one valid expense, click Submit to initiate the approval process. This sends the report to your manager, finance team, or department head for review.
Before submitting, take a moment to review any alerts. Red alerts indicate critical errors, such as missing receipts or expenses exceeding limits, and will block submission. Meanwhile, yellow alerts act as warnings but won’t prevent submission. If you need to make adjustments, use the Retract function to correct errors before resubmitting.
"Red alerts will prevent the report from being submitted, while yellow alerts are soft reminders." - Concur Support
In some organizations, automatic submission may be enabled. If no new expenses are added, you might see a "waiting" message instead. For those using corporate cards, ensure all charges are reconciled and matched to the appropriate report before hitting submit.
Once submitted, your report is automatically archived for future use.
Access Past Reports
All submitted reports are securely stored in EasyTripExpenses, making it easy to retrieve them later. These archived reports can be found in the Report Library, with storage duration depending on your plan:
- Starter Plan: 1 year of storage
- Pro Monthly Plan: 3 years of storage
- Pro Yearly Plan: 5 years of storage
This feature is especially helpful during tax season, audits, or when analyzing past travel trends.
To find a specific report, use the drop-down filter to search by timeframe or trip name. Every archived report includes receipt images and detailed expense records, so you won’t need to sift through emails or physical files. By going digital, you avoid the risk of losing paperwork - a mistake that could cost businesses up to $220 per sheet to reproduce.
Automating expense reports with AI
Conclusion
EasyTripExpenses takes the hassle out of managing travel expenses by automating everything - from receipt uploads to categorization, review, and submission. These steps simplify expense management, leaving behind the tedious and error-prone manual processes.
With EasyTripExpenses, you can significantly cut down processing time and minimize common errors. Forget about scrambling to find receipts at the end of the month or spending hours on data entry. Instead, you can instantly capture expenses, have them automatically categorized, and generate polished reports in seconds.
The platform also enforces spending limits and documentation rules in real time, ensuring compliance without requiring constant oversight. This is especially useful during tax season or audits, when manual mistakes can lead to costly correction fees.
For smaller teams, the savings are even more evident. Processing just 20 reports manually each month can cost over $26,000 annually. EasyTripExpenses eliminates that unnecessary expense while giving you real-time insights into spending patterns and speeding up reimbursement cycles. Plus, it scales effortlessly with your needs - no extra IT setup required. Whether you choose the free Starter plan or a Pro plan with up to 5 years of secure storage, EasyTripExpenses turns messy receipts into audit-ready reports.
Why wait? Start with your next trip and see how automation can make expense reporting a seamless, error-free experience.
FAQs
How does EasyTripExpenses ensure accurate currency conversion for expenses?
EasyTripExpenses takes the hassle out of currency conversion by using real-time exchange rates from reliable sources. It calculates conversions based on the daily average rate tied to the purchase date, ensuring the values match the actual transaction timing.
If the markets are closed, the platform defaults to the most recent available rate to keep everything accurate and consistent.
This approach removes any guesswork, so your expense reports are not only precise but also polished and professional.
What are the benefits of using AI to categorize business travel expenses?
Using AI to sort and categorize business travel expenses comes with some clear perks.
First, it streamlines the process by automating the organization of receipts and transactions, cutting out the hassle of manual data entry. Second, it boosts accuracy by reducing human errors, which means cleaner financial records and more dependable reports. Lastly, AI can align expenses with tax-deductible categories, making tax prep easier and ensuring everything stays compliant.
By handling these tasks efficiently, AI lightens the administrative load, freeing up businesses to focus on bigger-picture goals and improving overall workflow.
How can I access past expense reports for audits or tax filing?
You can access your past expense reports by logging into your account and heading to the Report History section. There, you'll find all previously generated reports securely stored and ready to download in either PDF or Excel formats.
Whether you're preparing for audits, filing taxes, or handling other financial tasks, this feature keeps your records organized and easily accessible whenever you need them.